Hot Games

Startup

Tech

Showing posts with label featured. Show all posts

OPPO R2001 MTK6589

Posted on Saturday, June 25, 2016 with No comments
  • Title: OPPO R2001 MTK6589

  • Listed: 02/16/2015 11:45 pm
  • ROM Version: BINARY FILES
  • Links: 
  • Links other than Needrom: OPPO R2001 MTK6589

DESCRIPTION


HOW TO FLASH
1. Wipe Data


2. Wipe Cache


3. Wipe Dalviks


4. Instal zip From sdcard
READ MORE

STOCK ROM ORIGINAL OPPO NEO 3 / R831K

Posted on with No comments
  • Title: STOCK ROM ORIGINAL OPPO NEO 3 / R831K
  • Listed: 05/28/2016 10:11 pm
  • ROM Version: 1.0.1

  • Links: 
  • Links other than Needrom: DOWNLOAD

DESCRIPTION


HOW TO FLASH
1. Wipe Data


2. Wipe Cache


3. Wipe Dalviks


4. Instal zip From sdcard
READ MORE

ROM Phone ARK Benefit M7 - ROM Android 5.1

Posted on with No comments
  • Title: ARK Benefit M7
ARK Benefit M7: ROM Phone ARK Benefit M7 - ROM Android 5.1
Update Official ROM ARK Benefit...

DESCRIPTION


ROM Phone ARK Benefit M7 - ROM Android 5.1
ONLY MT6735M
ROM 2 - Update Official ROM ARK Benefit M7 Version: Benefit_M7_HWV2_V004_160531_1914 – ALPS.L1.MP3.V1_LENTEK6735M.65U.L_P44  LMY47D
Install flash or FOTA
ATTENTION i don't know if this ROM is compatible with ROM 1
——————————————————————————————————————————————————————————
ROM 2 - Update Official ROM ARK Benefit M7 Version: Benefit_M7_HWV2_V003_151222_1800 – ALPS.L1.MP3.V1_LENTEK6735M.65U.L_P44  LMY47D
Install flash or FOTA
ATTENTION i don't know if this ROM is compatible with ROM 1
——————————————————————————————————————————————————————————
ROM 2 - Official ROM ARK Benefit M7 Version: Benefit_M7_HWV2_V002_151216_2100 – ALPS.L1.MP3.V1_LENTEK6735M.65U.L_P44  LMY47D
Install flash or FOTA
ATTENTION i don't know if this ROM is compatible with ROM 1 ( I think another motherboard )
——————————————————————————————————————————————————————————
ROM 1 – Update Official ROM ARK Benefit M7 Version: Benefit_M7_V008_20152910 – ALPS.L1.MP3.V1_LENTEK6735M.65U.L_P12 – LMY47D
Install flash or FOTA
——————————————————————————————————————————————————————————
ROM 1 – Update Official ROM ARK Benefit M7 Version: Benefit_M7_V008 – ALPS.L1.MP3.V1_LENTEK6735M.65U.L_P12 – LMY47D
Install flash or FOTA
——————————————————————————————————————————————————————————
ROM 1 – Update Official ROM ARK Benefit M7 Version: Benefit_M7_V007 – ALPS.L1.MP3.V1_LENTEK6735M.65U.L_P12 – LMY47D
Install flash or FOTA
——————————————————————————————————————————————————————————
ROM 1 – Update Official ROM ARK Benefit M7 Version: Benefit_M7_V006 – ALPS.L1.MP3.V1_LENTEK6735M.65U.L_P12 – LMY47D
Install flash or FOTA
——————————————————————————————————————————————————————————
ROM 1 – Update Official ROM ARK Benefit M7 Version: Benefit_M7_V005 – ALPS.L1.MP3.V1_LENTEK6735M.65U.L_P12 – LMY47D
Install flash or FOTA
——————————————————————————————————————————————————————————
ROM 1 – Update Official ROM ARK Benefit M7 Version: Benefit_M7_V004 – ALPS.L1.MP3.V1_LENTEK6735M.65U.L_P12 – LMY47D
Install flash
——————————————————————————————————————————————————————————
ROM 1 – Update Official ROM ARK Benefit M7 Version: Benefit_M7_V003 – ALPS.L1.MP3.V1_LENTEK6735M.65U.L_P12 – LMY47D
Install flash
——————————————————————————————————————————————————————————
ROM 1 – Update Official ROM ARK Benefit M7 Version: Benefit_M7_V002 – ALPS.L1.MP3.V1_LENTEK6735M.65U.L_P12 – LMY47D
Install flash or FOTA
——————————————————————————————————————————————————————————
ROM 1 – Official ROM ARK Benefit M7 Version: Benefit_M7_V001 – ALPS.L1.MP3.V1_LENTEK6735M.65U.L_P12 – LMY47D
Gapps include – No Rooted
Language support : Multilang

Install ROM:
- Unpack FlashTools, and Click on Flash_tool.exe
- Select "scatter-Loading" and search MT6735_Android_scatter.txt in ROM
- Wait file to be added into Flash Tool
- Select "Download Only" or if upgrade "Firmware upgrade"
- Turn off your phone, remove the battery (if the battery is removable) and replace it after some seconds (and don't turn on the phone).
- Press “Download” button to start
- and connect your phone into the computer via USB data cable.
- The process will start and a red progress bar will appear after color purple, yellow.
- And green circles display
- Finish !
- You can now safely disconnect your phone and turn it on.
READ MORE

Samsung Galaxy A3 (SM-A300H) Firmware

Posted on Monday, May 23, 2016 with No comments
Samsung Galaxy A3 (SM-A300H) 4.4.4 Kitkat Firmware


Mobile : Samsung Galaxy A3
Model : SM-A300H
System Version : KitKat 4.4.4
Baseband : XSG A300HXXU1AOC1

Download mediafire Link 

 Samsung Galaxy A3 (SM-A300H) 5.0.2 Lollipop Firmware

Mobile : Samsung Galaxy A3
Model : SM-A300H
System Version : Lollipop 5.0.2
Baseband : KSA A300HXXU1BOK5

Download mediafire Link 
 
READ MORE

Samsung Galaxy Z3 (SM-Z300H) Firmware

Posted on with No comments
Samsung Galaxy Z1 (SM-Z300H) 2.4.0.2 Tizen Firmware


Country: India

Tizen Version: 2.4.0.2

Product Code: INS

PDA: Z300HDDU0BPB2

CSC: Z300HODD0BPB2

Download Google Drive Link
READ MORE

Samsung Galaxy Z1 (SM-Z130H) Firmware

Posted on with No comments
Samsung Galaxy Z1 (SM-Z130H) 2.3.0.1 Tizen Firmware


Country: India

Tizen Version: 2.3.0.1

Product Code: INS

PDA: Z130HDDU0BOK2

CSC: Z130HODD0BOK2

Download Google Drive Link

 Samsung Galaxy Z1 (Z130H) 2.3.0.0 Tizen Firmware

Country: India

Tizen Version: 2.3.0.0

Product Code: INS

PDA: Z130HDDU0BOB3

CSC: Z130HODD0BOB3

Download Google Drive Link
READ MORE

Miracle Box New (V1.86) 100% Work

Posted on with No comments


Support : 
1. All Winner READ INFO
2. All Winner UNLOCK
3. All Winner PATTERN UNLOCK
4. All Winner IMEI REPAIR
5. Samsung Flasher ADDED
6. Android MTK IMEI REPAIR
7. Android modify Samsung writing
8. Android add APK
9. SPD add 8810 for more flash
10. Coolsand add support for more flash
11. Root Support  SPD
12. China All CPU Read and Writing

Download 4shared Link 
READ MORE

Nokia X2-02 (RM-694) Bangla Flash File 1000% Working

Posted on with No comments
READ MORE

JURASSIC UniAndroid Tool v.5.0.3 Full Download Now

Posted on with No comments

This update comes with Android VCF Reader

1. In your Android device import contacts to sd card
2. A VCF file will be created
3. Copy that file using Jurassic Droid Explorer
4. Read VCF entries using the VCF Reader


Additional Info:

1. Fixed more bugs found.
2. Improve read/write of adb_usb.in

Download 4shared Link
READ MORE

Nokia C6-00 RM-612 Flash File/Software/Firmware Download

Posted on Wednesday, April 27, 2016 with No comments

Nokia C6-00 RM-612 Flash File/Software/Firmware  Download

The latest flash files of Nokia C6-00 have been released with brilliant new features. Some times your mobile working so slow or completely stopped with the reason of its corrupted or outdated firmware. Flashing of mobile does at those stage if mobile is working slow or hanging. Here you can use these flash files for flash your phone by using different tools or boxes. Your flash file consist on three main parts like MCU, PPM and CNT. These three files are managing your mobile all data like messaging, calling and operating data. If you are downloading instead of Nokia fire some developers allowing you to download flash files in one file like RAR. So after downloading you will need to extract it with winRaR. You can flash your mobile with flashing tools or boxes. Flashing tools allowing you to flash your mobile with USB data cable without connecting flashing box. However it is little bit difficult work for you to flash your mobiles with flashing tools instead of flashing boxes.


We are sharing  and official site downloading links so visitors can manage downloading links easily. You can download latest flash files of your mobile from below downloading links. You can contact us via commenting if you are facing difficulty during downloading. Now you can get your downloading links from below links.
Downloading links
Nokia C6-00 Flash File
READ MORE

Nokia E63 RM-437 latest flash files direct download

Posted on with No comments

Nokia E63 RM-437 latest flash files  direct download

  12 Comments
Nokia E63 RM-437 latest flash files direct download only 3 files MCU,PPM,CNT just click on file for direct download
Single link

1) MCU
2) PPM
3) CNT
READ MORE

Tutorial Para Restableser de fabrica

Posted on Wednesday, March 2, 2016 with No comments

Tutorial Para Restableser de fabrica


Antes De Empesar El Tutorial Dejen me Desirles Que Este Ejercicio No Nos Tomara Mas De 10 Minutos En Realizarlo 


Tutorial Para  Restableser de fabrica  (Hard Reset) O  Tan bien Nos Sirve Para Quitar Contraseñas O Patrón De Contraseña,O Algunas Beses Nuestra Table o Smartfon Esta Lento,la pila Rápidamente se Descarga De Tantas Aplicaciones  Que se Executan En Segundo Plano Y No Nos Damos Cuenta.

Tan bien Nos Puede Serbir Para Cuando Nuestra Tablet O Smartfon Al Encender Se Queda Trabado En El Logo Android O En El Logo De La Empresa O Marca De Su Tablet O Smartfon

Nota Se Recomienda Tener Por Lo Menos El 80%De La  Batería Cargada,  Hacer Una Copia De Seguridad A Los archivos Importantes  Por que se borrarán
todo Lo que instalemos o descarguemos  a nuestra tablet, que dará con las mismas aplicaciones como si la acabáramos de comprar


Modo Fácil ( Novatos)

Para Los Dispositivos Que  No Tienen Ningún problema He Inician  Normalmente Pero Que se siente Que se  Alenta o Que La Pila Te Dura Un Poco Menos De Lo Normal. esto sucede Por Tantas Aplicaciones O Alguna De Las Aplicaciones  Esta Probocando Este O Varios Problemas, O Se Están Ejecutando En Segundo Plano Y No Tedas Cuenta.Sigue Estos Pasos Muy Simples,Recuerda  Respaldar Tus Archivos Inportates.

1. Ve al menú Ajustes, y selecciona “Configuración de la Privacidad”. Una vez ahí, busca "restablecer los datos de fábrica".

En algunos dispositivos aparece otra opción para borrar la Tarjeta SD (esta opción depende del fabricante y la versión de Android).

2. Cuando aceptes el reset, se borrará toda la partición del disco, datos y caché y al término del proceso, el dispositivo automática mente se reiniciará.

Algo que no debe preocuparte es  perder la información en tu tarjeta SD, ya que esta se mantiene  intacta al igual que la carpeta sistema (siempre y cuando no hayas seleccionado en el menú la opción de borrar SD). Por tanto el teléfono quedará tal y como venía de fábrica.es desir Como Cuando lo Compraste.


Modo Avanzado


Este Método Es Para Cuando Nuestro Dispositivo  Se Quedo Trabado O Simplemente No Inicia,Recuerden Cargar La Batería De Su Dispositivo Por Lo Menos Un 80% Y Tan bien Nos Servirá Para Quitar la Contraseña O Si Se A quedado Bloqueado Y Se te Ha Olvidado La Contraseña

Primero Antes De Empesar Les Explicare El Significado De Los 3 Pasos Que Vamos A Realisar

1-reboot system now: Reinicio Normal

2- Wipe Data/Factory Reset: Se borrarán todos sus datos personales y el sistema volverá al estado original de fabrica (Hard Restet)

3- Wipe Cache Partition:  A través de esta opción borramos la memoria caché. En el caché encontramos los archivos de uso más frecuente para un acceso rápido, Historial De Navegacion. No se borrarán los datos personales.

Ahora Si Vamos Con La Tablet

En Algunos Dispositivos Nos Podrán Aparecer Algunas Diferencias En El Menú Del Recovery Pero No Se Preocupen El Procedimiento Sera El Mismo Por Eso Estaré Utilizando Diferente Imagenes De Diferente Dispositivos Una Recopilacion De Imagenes De Google


Nota Para Entrar Al Modo Recovery En  Nuestro Dispositivo Android Se Requiere Un Patrón De Teclas Es Desir Un Conjunto De Botones  o Presionando 2 O 3 Botones Alá Bes Eso Es Dependiendo El Dispositivo Que tengan Puede Ser Yo Utilizar El Mas Habitual Tan bien Pueden Consultarlo En Google

Ejemplo 1
Presionando El Vol + El Botón De Power Al Mismo Tiempo  Hastas Que Aparesca El Menú

Ejemplo  2
Presionando El Vol - El Botón De Power Al Mismo Tiempo  Hastas Que Aparesca El Menú

Ejemplo  3
Presionando El Vol + El Botón De Home Al Mismo Tiempo  Hastas Que Aparesca El Menú

Ejemplo 4
Presionando El Vol - El Botón De Home Al Mismo Tiempo  Hastas Que Aparesca El Menú

Ya Dicho Esto Sigamos


 1 Una Bes Que Nuestra Tablet Este  Cargada Por lo Menos Un 80%

2 Apagamos La Tablet Totalmente,Presionando El Botón Power Y Le Damos En Apagar Hasta
Que Este Totalmente Apagada

3 Con Nuestra Tablet Apagada Presionamos El Botón Vol+ y El Botón De Power Al Mismo Tiempo
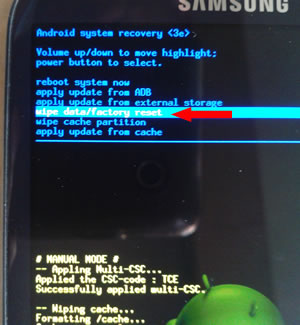
Hasta Que Entremos En Modo Recovery De Nuestra Terminal Android,Y Nos Apare sera En La Pantalla Un Menú Como Este


4 Con La Tecla Subir O Vajar Volumen Se Desplazan Por El Menú Y  Se Posicionan En Wipe Partition Cache Y Con El Botón  De Power Damos Enter


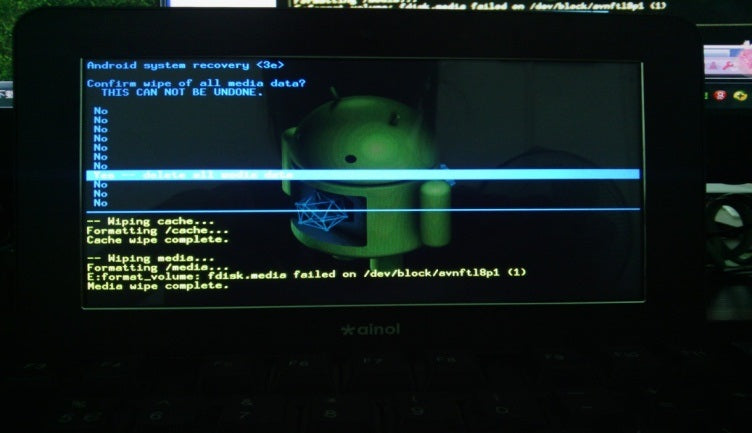
5 Y nos Aparesera Este Menú Y Con Las Teclas De Volumen Nos Desplazamos Hasta Donde Dise
yes-delete all media data Y Damos Enter Con El Botón De Power, Y Esperamos Aque Terminé El Proceso


6 Una Bes Que  El Proceso Termine Los Llevara Al Menú Principal Y Nos Desplazamos Nuevamente Con  Las Teclas De Volume Wipe Data/ Factory Reset Y Damos Enter Con La Tecla
De Power


7 Y De Nuevo Nos Llevara A Este Menú Y Nos Desplazamos Hasta Donde Dise
yes-delete all media data Y Damos Enter Con El Botón De Power, Y Esperamos Aque Termine
 El Proceso


8 Una Bes Que Termine El Proceso Nos Regresara Al Menú Principal Y Elegimos
Reboot System Now Y Damos Enter Con La Tecla De Power Y Nuestro Dispositivo Se Reiniciara


9 Recuerden Que Al Reiniciarse Tardara Un poco Mas De Lo Debido Por que Iniciara Como Si Fuera De Fabrica Igual Que Cuando Lo Compramos Así Es que Tengan Paciencia


Bueno Espero Y Les Sea De Gran Ayuda

Recuerden Si Tienen Algún Problema Aganlo Saber En Los Comentarios


READ MORE
...